Pressure Switch Adjustment
Pressure switch adjustment
What the pressure switch does-
The pressure switch automatically starts and stops your water bore pump according to the water pressure in the system.
Adjustment directions can differ between switch models, so identify your switch before making any changes.
Important electrical safety warning-
The pressure switch contains live electrical terminals.
Always isolate the electrical supply before removing the pressure-switch cover or making an adjustment. Confirm that the power is off with a suitable tester.
Electrical wiring, repairs and testing must only be performed by a suitably qualified electrician.
Never touch the adjustment mechanism or any component inside the switch while the power is connected.
Before adjusting the pressure switch-
A pump that continues running is not necessarily fitted with a faulty pressure switch.
The pump can only switch off if it produces enough pressure to reach the pressure switch’s cut-out setting. If the pump’s maximum available pressure is below the cut-out setting, the switch contacts will correctly remain closed and the pump will continue running.
Before adjusting or replacing the switch, check:
The pressure available at the surface depends partly on the water level in the bore.
During extended pumping, the water level may fall from its standing level to a lower dynamic pumping level. The pump must then lift the water farther, reducing the pressure available at the surface.
A pump may therefore reach the pressure-switch cut-out setting when the bore is fully recovered but fail to reach the same setting after pumping for an extended period.
Seasonal changes, dry weather, bore drawdown, recovery rate, pump depth, pipe friction and restrictions can all affect the pressure available to operate the switch.
If the pump will not switch off-
First, close the main outlet valve and observe the pressure gauge.
If the pressure rises to the cut-out setting and the pump stops, the cause is likely to be water demand or a leak downstream of the pump system.
If the pressure stops rising and the pump continues to run, the pump is not reaching the current cut-out setting.
Do not leave the pump running indefinitely against a closed valve.
Record the maximum pressure shown on the gauge.
The cut-out setting may need to be reduced slightly so the pump can switch off reliably under its current operating conditions.
Test the setting both after the bore has recovered and after an extended pumping period.
Adjusting the cut-out pressure-
For the Telemecanique/Schneider XMP pressure switch shown:
Do not lower the cut-out pressure more than necessary.
The system must still provide adequate operating pressure and the pump must not cycle rapidly between starting and stopping.
Pressure-tank setting-
The pressure tank must be correctly charged in relation to the pump’s cut-in pressure.
The tank air pressure must be checked with:
Avoid rapid cycling-
While water is being used, the pressure-switch contacts should normally remain closed and the pump should run steadily.
If the pump repeatedly starts and stops while water is being used, check:
When the pressure switch may be faulty-
Further testing may be required if:
First confirm the actual system pressure and whether the pump can reach the selected cut-out setting.
Information to record before requesting assistance-
To help us diagnose the system, please provide:
The pressure switch automatically starts and stops your water bore pump according to the water pressure in the system.
- When a tap or valve is opened, the system pressure falls and the switch starts the pump.
- When all taps and valves are closed, the pump rebuilds pressure until the switch reaches its cut-out setting and stops the pump.
- The pressure tank stores a small volume of pressurised water, preventing the pump from starting every time the system loses a small amount of water.
Adjustment directions can differ between switch models, so identify your switch before making any changes.
Important electrical safety warning-
The pressure switch contains live electrical terminals.
Always isolate the electrical supply before removing the pressure-switch cover or making an adjustment. Confirm that the power is off with a suitable tester.
Electrical wiring, repairs and testing must only be performed by a suitably qualified electrician.
Never touch the adjustment mechanism or any component inside the switch while the power is connected.
Before adjusting the pressure switch-
A pump that continues running is not necessarily fitted with a faulty pressure switch.
The pump can only switch off if it produces enough pressure to reach the pressure switch’s cut-out setting. If the pump’s maximum available pressure is below the cut-out setting, the switch contacts will correctly remain closed and the pump will continue running.
Before adjusting or replacing the switch, check:
- all taps, valves and outlets are completely closed;
- there are no leaks in the pipework;
- the non-return valve is holding;
- the pressure gauge is operating correctly;
- the pressure tank has the correct air pre-charge;
- the pump is producing its expected pressure; and
- the bore has sufficient water and has recovered adequately.
The pressure available at the surface depends partly on the water level in the bore.
During extended pumping, the water level may fall from its standing level to a lower dynamic pumping level. The pump must then lift the water farther, reducing the pressure available at the surface.
A pump may therefore reach the pressure-switch cut-out setting when the bore is fully recovered but fail to reach the same setting after pumping for an extended period.
Seasonal changes, dry weather, bore drawdown, recovery rate, pump depth, pipe friction and restrictions can all affect the pressure available to operate the switch.
If the pump will not switch off-
First, close the main outlet valve and observe the pressure gauge.
If the pressure rises to the cut-out setting and the pump stops, the cause is likely to be water demand or a leak downstream of the pump system.
If the pressure stops rising and the pump continues to run, the pump is not reaching the current cut-out setting.
Do not leave the pump running indefinitely against a closed valve.
Record the maximum pressure shown on the gauge.
The cut-out setting may need to be reduced slightly so the pump can switch off reliably under its current operating conditions.
Test the setting both after the bore has recovered and after an extended pumping period.
Adjusting the cut-out pressure-
For the Telemecanique/Schneider XMP pressure switch shown:
- Turn the large adjustment dial clockwise to increase the cut-out pressure.
- Turn the large adjustment dial anticlockwise to reduce the cut-out pressure.
- Isolate the electrical supply.
- Confirm that the pressure switch is not live.
- Remove the pressure-switch cover.
- Turn the large adjustment dial approximately one-quarter turn in the required direction.
- Refit the cover.
- Reconnect the electrical supply.
- Close all water outlets and allow the pump to build pressure.
- Record the pressure at which the pump switches off.
- Open an outlet and record the pressure at which the pump restarts.
- Repeat the test several times to confirm reliable operation.
Do not lower the cut-out pressure more than necessary.
The system must still provide adequate operating pressure and the pump must not cycle rapidly between starting and stopping.
Pressure-tank setting-
The pressure tank must be correctly charged in relation to the pump’s cut-in pressure.
The tank air pressure must be checked with:
- the electrical supply isolated;
- the pump switched off;
- the water pressure completely drained from the system; and
- the pressure gauge reading zero.
Avoid rapid cycling-
While water is being used, the pressure-switch contacts should normally remain closed and the pump should run steadily.
If the pump repeatedly starts and stops while water is being used, check:
- the pressure-switch settings;
- the pressure-tank air charge;
- the condition and size of the pressure tank;
- the system flow rate; and
- the pump’s available pressure and flow.
When the pressure switch may be faulty-
Further testing may be required if:
- the pressure rises above the established cut-out setting but the switch does not open;
- the contacts remain closed after pressure has reached the correct setting;
- the switch does not respond to adjustment;
- the contacts are burnt, damaged or mechanically jammed;
- the switch leaks water; or
- operation remains inconsistent after the pump pressure, tank charge and settings have been verified.
First confirm the actual system pressure and whether the pump can reach the selected cut-out setting.
Information to record before requesting assistance-
To help us diagnose the system, please provide:
- The pressure at which the pump starts.
- The pressure at which the pump stops.
- The maximum pressure reached if the pump will not stop.
- Whether the test was performed with the main outlet valve closed.
- The pressure-tank air charge, checked with the water pressure completely drained.
- The bore’s standing and dynamic water levels, if known.
- How long the pump had been operating before the problem occurred.
- Photographs of the pressure switch, pressure gauge and complete installation.
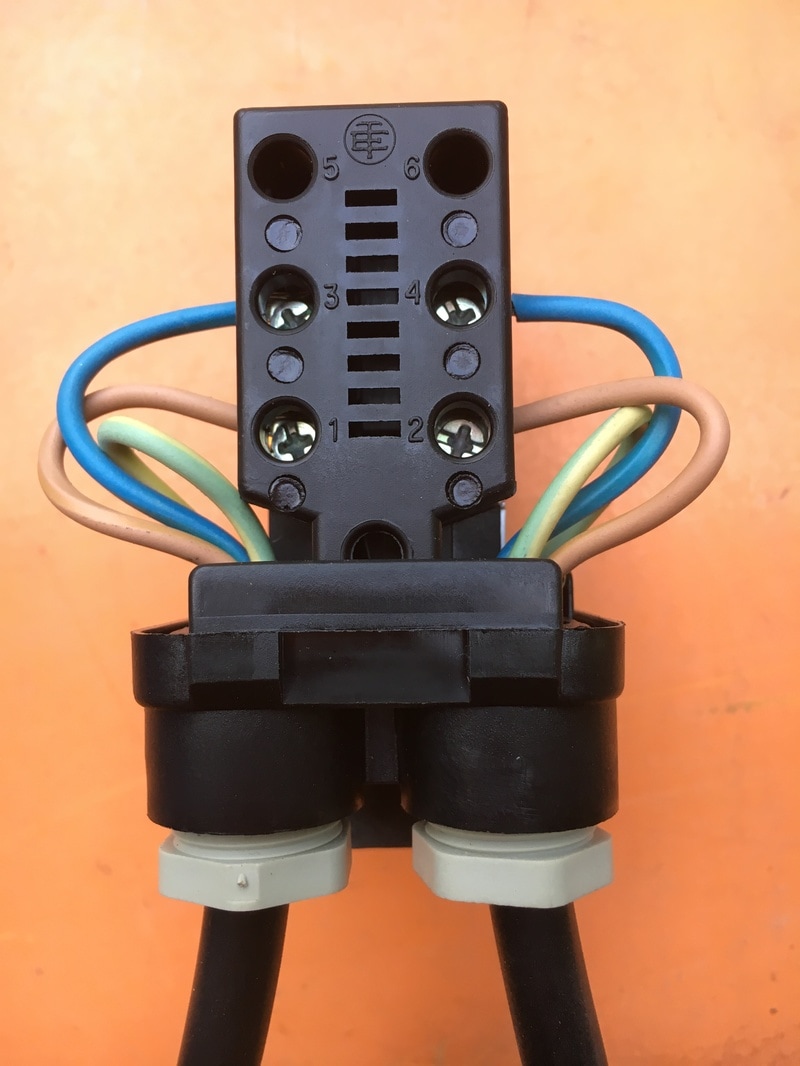
Correct wiring of Telemecanique XMP12 Pressure Switch.
|
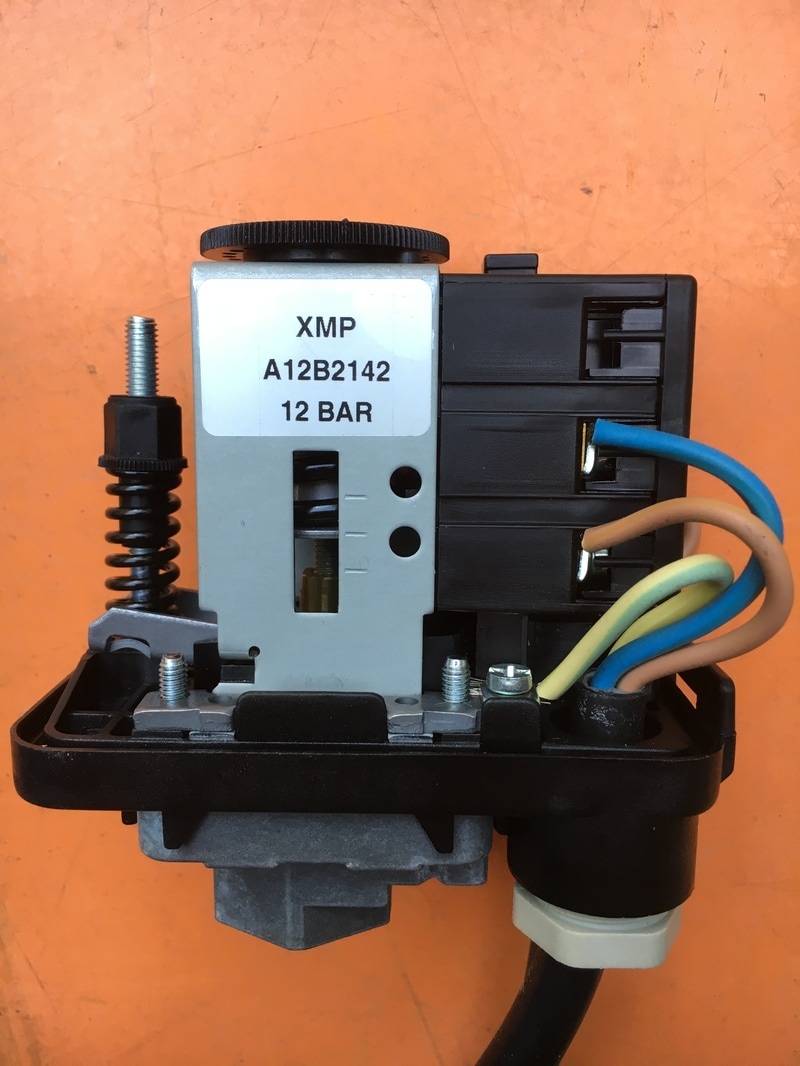
Correct wiring of Telemecanique XMP12 Pressure Switch.
|
FREE ADVICE CALL: 1300 727 042
Email: [email protected]
Email: [email protected]